Quick Guide
Overview of Buttons
Each of the NT200 buttons can have multiple functions, depending on whether you press and release, or you press and hold (for about 3 sec.)
Power/Switch Lessons
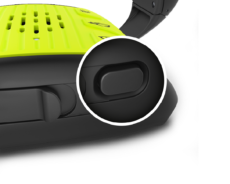
Short Press: Switch between default and custom lesson.
Long Press: Power on/off.
Source / Device-to-Device Pairing
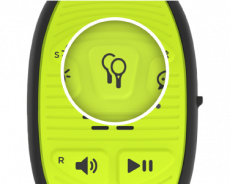
Short Press: Set Source — Select which impacts will trigger instructions: My Hits, Opponent Hits, or Both.
Long Press: Device-to-device pairing. Do this on one device, then the other to connect them to each other.
Frequency / Bluetooth Pairing with App
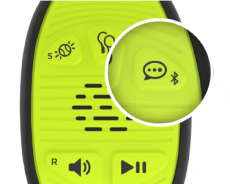
Short Press: Set Frequency — Select how often you hear instructions.
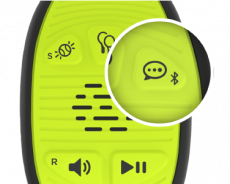
Long Press: Initiate BlueTooth pairing to your phone. Once NT announces discovery mode, go to your phone’s Settings —> BlueTooth, look for the NT device, and connect. Note that once your phone “knows” this NT device, you can just connect in Settings without doing discovery.
Play / Pause
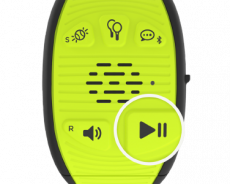
Short Press: Start or resume lesson. If already playing, this will announce current drill. Press again within a few seconds to skip to next drill.
Long Press: Pause current drill.
Volume / Return Coaching Instruction (indicated by “R”)
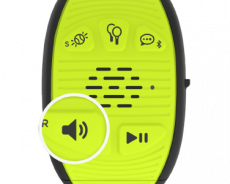
Short Press: Adjust volume, or mute.
Long Press: Ask for a “Return” coaching instruction (Current drill must include “Return” instructions).
Sensitivity / Serve Coaching Instruction (indicated by “S”)
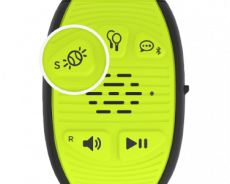
Short Press: Set how sensitive NeuroTennis is when detecting impacts. Set to “max” for a device attached to a ball machine.
Long Press: Ask for a “Serve” coaching instruction (Current drill must include “Serve” instructions).
Charging and Power
Charging
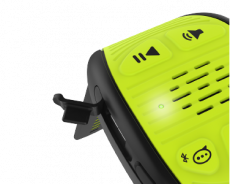
Your NT200 can typically run for about 2.5 hours on a full charge. Actual duration will depend on factors such as coaching instruction frequency and volume level.
To charge your device:
- If your device is on, turn it off by pressing and holding the power button for 3 sec.
- 2. Open charge port gently (see picture). NOTE: Avoid getting moisture, clay, or dirt into the charge port.
- 3. Plug in Android-style Micro-USB charger (cable provided).
- 4. LED will blink while charging.
- 5. LED will turn solid when charging is complete.
While in use, NT will tell you if its battery level is low.
Powering On and Off
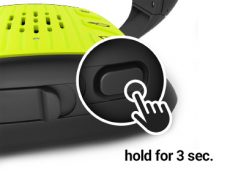
- To power on, press and hold power button for 3 sec.
- LED will illuminate.
- Listen for “NeuroTennis” announcement.
- To play in partner mode, make sure both devices are on, and follow instructions for pairing devices under “Pairing”. For solo mode, just press “Play” to begin.
- To power off, press and hold power button for 3 sec.
Pairing and Communication
Pairing NT Devices for Partner Play
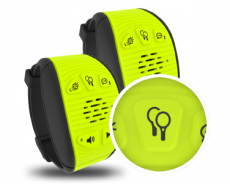
- On one device, press “Device-to-Device Pairing” button (see picture) until you hear pairing announcement.
- On second device, do the same.
- Listen for “Connected” announcement.
NOTE: The pairing mode stays active for 1 minute, giving you plenty of time to place the second device in that mode. If you want to exit the mode prior to connecting, simply press the button again.
Connecting an NT200 to the App
Connecting an NT200 to the app allows you to:
- load custom lessons and coaching instructions
- set device name
- check device battery level
- update device software
To connect the app and device:
- Go to your phone’s settings and ensure Bluetooth is enabled.
- Press and hold the “Bluetooth pairing” button (see picture) until you hear the announcement.
NOTE: Pressing this button again will exit Bluetooth pairing mode. - In the NT app, go to main menu and tap “Devices”.
- Tap “Connect a Device” and follow instructions to pair your phone and the device.
- If your phone discovers your device but still receives a “pairing unsuccessful” message, go to your phone settings and “forget” the device. Then, try pairing again.
NOTE: Bluetooth can be slow to initially discover and connect. 20-30 sec. is typical. Please be patient.
Loading Custom Lessons on NT200
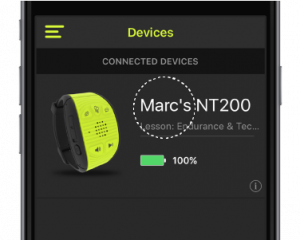
Once your NT200 and phone are paired, you can download a custom lesson. A “custom lesson” is any lesson other than the default lesson built in to your NT200. It may be from the NT library or it may be one you or your coach created (see instructions on creating custom lessons).
There are 2 ways to load a custom lesson:
- From the main menu, go to “Devices”.
- Tap on a connected device (see picture).
- Choose “Send Lesson” from the menu.
- Select the lesson you want to load.
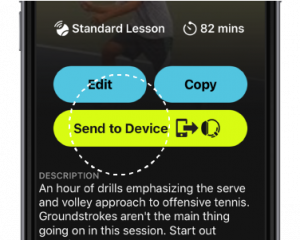
The second way is to start with the lesson you want, as follows:
- From the main menu, go to “Lessons”.
- Tap on the lesson you want to load.
- Tap on “Send to Device” (see picture).
- Choose the desired device
Quickly Adding Coaching Instructions
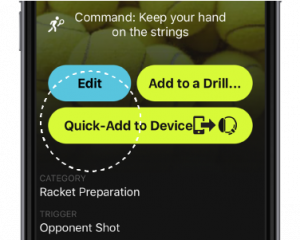
You or your coach may sometimes have an idea for a new coaching instruction while you are in the middle of a lesson using NT. You could record the new coaching instruction and add it to a drill that is in your lesson, and then reload the entire lesson on to your NT200.
However, there is a quicker way, using the “Quick-Add to Device” feature. Here are the steps:
- Be sure your lesson is currently playing the drill to which you want to add coaching instructions.
- Pause the lesson in progress on your device by pressing and holding “Play/Pause”.
- Go into the NT app on your smartphone and either find an existing coaching instruction you want, or create a new one (see instructions on customizing coaching instructions).
- On the coaching instruction’s main screen, tap on “Quick-Add to Device” (see picture).
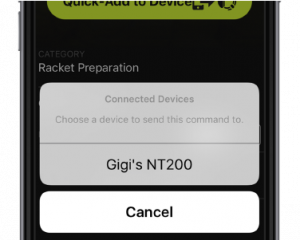
NT will show you the connected devices.
NOTE: If the device of interest is not already connected to your phone, follow the instructions for “Connecting an NT200 to the app”.
Select the NT200 to which you want to add the coaching instruction (See picture).
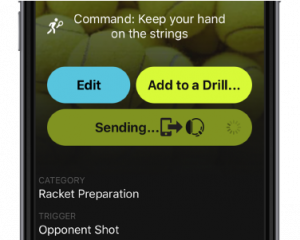
The NT app displays “Sending…” while it transfers the coaching instruction to the device.
Once complete, you will see a message, as shown below.

The coaching instruction has been added to the current drill. Just repeat the process to add as many coaching instructions as you like.
Changing Your NT Device Name
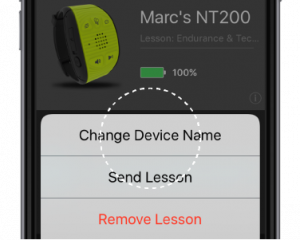
Your NT device ships with a generic name. You should give your devices names you will recognize, especially if you play with friends who have NT.
- From the main menu, go to “Devices”.
- Assuming you have already paired your phone and device, tap on the device you want to rename.
- Tap on “ Change Device Name” (see picture).
- Enter the new device name.
Checking Your NT Battery Level
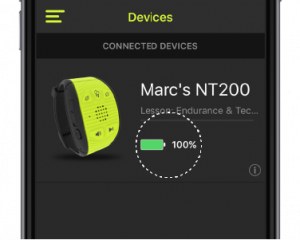
Your NT device reports its battery level estimate back to the NT app when it is paired.
- From the main menu, go to “Devices”.
- For each paired device, the current battery level will be shown (see picture).
NT Adjustments on the Court
Setting Volume

- First press of “volume” will state current level.
- Press repeatedly to adjust from Low to Max.
- Press again to mute.
NOTE: When muted, other keys will not function. NT will remind you that it is muted.
Setting Impact Sensitivity

Sensitivity level controls how much impact it takes for NT to detect a hit.
- Press “Sensitivity” button repeatedly to adjust from Low to Max. Default is ‘high’
Setting Coaching Instruction Frequency

Coaching Instruction Frequency controls how often NT gives you coaching instructions after hits (yours, as well as your opponent’s). This is an average frequency, and NT randomizes coaching instructions, so you may sometimes hear several in a row, and sometimes hear none for several shots.
Playing Lessons and Drills
Playing and Pausing Drills

The “Play/Pause” button controls which lesson and drill you are using. Also use it to pause or resume the current drill. A regular press provides certain actions, and a long press (press and hold for 3 seconds) provides others, as explained below.
- After powering on, you will hear the current lesson name. Press “Play” to start the lesson.
- Your lesson is now running. At any time, if you have not pressed “Play” in the last 5 sec., pressing it just reminds you of the current drill.
- To pause the drill, press and hold for 3 seconds.
- To resume the drill, press “Play”.
NOTE: NT announces when a drill reaches the half-way point. In certain drills where players take turns (e.g., being at the net), this is a good time to switch places.
Moving to the Next Drill

- As mentioned if you have not pressed “Play” in the last 5 sec., pressing it just announces the current drill.
- Press “Play” again within less than 5 sec. to move to the next drill.
NOTE: If you want to go forward several drills, just keep pressing play until you reach the drill you want. When you pass the last drill in the lesson, NT will start again at the first drill.
Extending the Current Drill’s Duration

- One minute before the end of a drill, you will hear a chime and a time warning. NT offers you a chance to extend the drill, in case you feel like continuing.
- To do this, press “play” within 5 sec. of the chime
Switching Between Default and Custom Lessons
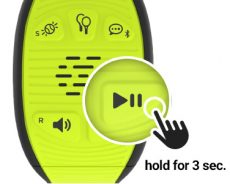
The default lesson is built into the NT device and always available. If you have also downloaded a custom lesson from the NT app (see instructions on loading custom lessons), you may want to switch back and forth between the default and custom lessons. Here’s how:
The simplest way to remember is this: Press and hold “Play/Pause” for 3 sec., and then do the same thing again. That’s it!
For a more detailed step-by-step explanation, follow these steps:
- Whichever lesson you are on, pausing is the first step to switching. Press and hold “Play/Pause” for 3 sec. to pause the current drill.
- You will hear instructions telling you to press and hold “PLAY/PAUSE” for 3 sec. AGAIN in order to switch to the other lesson.
- Press and hold as instructed until NT announces the lesson name.
NOTE: If your second press is not held for 3 sec., you will just resume the current lesson. If you still want to switch lessons, just go back to step 1.
Lessons, Drills, and Instructions in the app
What’s in a Lesson?
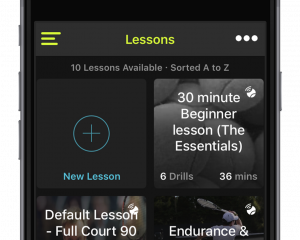
- A lesson contains a sequence of drills.
- A drill contains any number of coaching instructions.
- NT provides a library of coaching instructions, drills, and lessons. These are called “standard”, and are denoted by this icon.

- You can also create your own. These are called “custom”, and are denoted by this icon.

- Your custom coaching instructions can include your own audio and video recordings.
- Mix and match: a custom drill can contain a mix of custom and standard coaching instructions.
- Similarly, a custom lesson can contain a mix of custom and standard drills.
Using Player Levels
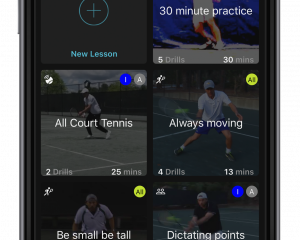
When browsing lessons or drills, you can use the sort feature and select “Beginner to Advanced” to organize by level.
Some drills or lessons are appropriate for multiple levels, so it is possible to have combinations, such as “intermediate and advanced”, “beginner and intermediate”, or “All”.
When you are browsing lessons or drills, you can use the “Sort” feature to organize by level. Select “Beginner to Advanced.”
Creating Custom Coaching Instructions
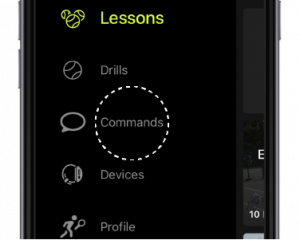
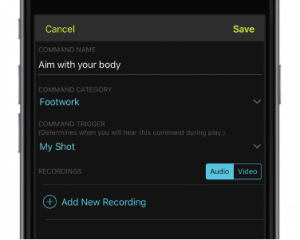
Step 2: Enter Coaching Instruction Information
- Enter a name for the new coaching instruction, for example, “Aim with your body”. Tap “Done”.
- Set the trigger to “My Shot” or “Opponent shot”, “Serve” or “Return” — Serve and Return coaching instructions are triggered by button presses on the NT200, instead of by hits.
- Tap on “Add New Recording” and follow the instructions to record audio.
- After recording, choose a name for the person who recorded the coaching instruction. This may be used later to select voice preferences.
NOTE: You can have as many audio recordings as you want for a coaching instruction. You can add more at any time.
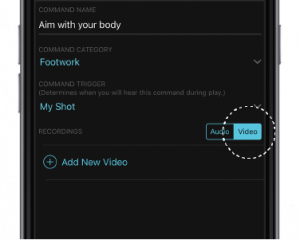
Step 3: Create Explanatory Video for the Coaching Instruction
- You can record a video for your coaching instruction to explain its purpose and to demonstrate what to do.
- Tap on the “Video” tab (see picture). Then tap “(+) Add New Video” and follow instructions to choose an existing video from your phone, or record a new one.
NOTE: You can have as many videos as you wish for a coaching instruction. You can add more at any time.
Creating Custom Drills
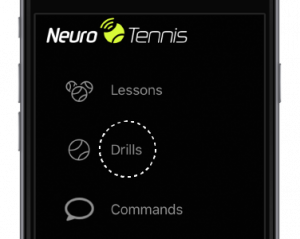
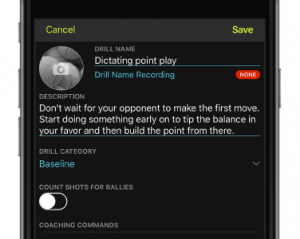
Step 2: Enter Drill Information
- Enter the drill name and press “Done”.
- Tap on the drill name recording and follow the instructions to record.
- Enter a description of the drill’s purpose (optional).
- Change drill category, if desired.
- Decide if you want NT to count shots in your rallies during this drill.
- Tap “+ Add Coaching Instructions to Drill” to start choosing coaching instructions for your drill.
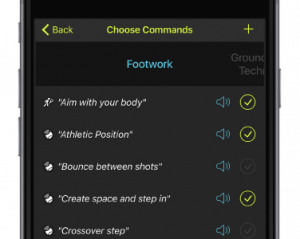
Step 3: Adding Coaching Instructions
- After tapping “+ Add Coaching Instructions to Drill”, the “Choose Coaching Instructions” screen appears.
- Swipe left and right to access other coaching instruction categories.
- Coaching Instructions included in your drill are shown with a check mark. Check or uncheck coaching instructions, as desired.
- When you are done, tap “Back” in the upper left corner to return to your drill screen.
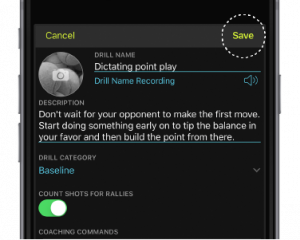
Step 4: Save the Drill and Add It to a Lesson
- Tap “Save” to save your drill. Even if you are not online, the NT app will remember your drill.
- You can add your drill to a lesson now or later. To add it now, tap on “Add to Custom Lesson” and choose a lesson from the menu.

NOTE: You can only add to custom lessons, not standard ones. - Another option is to send your drill directly to the device as a “standalone drill”, saving you the step of first adding the drill to a lesson. This downloads a lesson containing just one drill. Do this by tapping on “Send to Device”.

Creating Custom Lessons
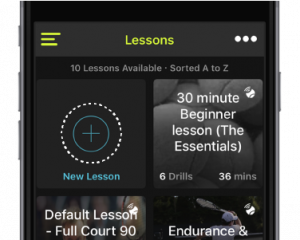
Step 1: Create a New Lesson
- From the main menu, choose “Lessons”.
- Tap on “(+) New Lesson” button (see picture).
- Enter the name of the lesson.
- Tap on the lesson name recording and follow the instructions to record.
- Enter a description of the lesson’s purpose (optional).
- Tap “+ Add Drills to Lesson” to start choosing drills for your lesson.

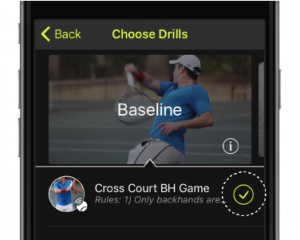
Step 2: Enter Lesson Information
- After tapping “+ Add Drills to Lesson”, the “Choose Drills” screen appears.
- Swipe left and right to access other drill categories.
- Drills in your lesson are shown with a check mark (see picture). Check or uncheck drills, as desired.
- You can also tap on any drill’s name if you want to see what it contains. A screen opens to show you the drill’s contents and offers a button to add the drill to your lesson.
- When you are done adding drills, tap “Back” in the upper left corner to return to the your lesson screen.
NOTE: It is possible to add the same drill to a lesson multiple times.
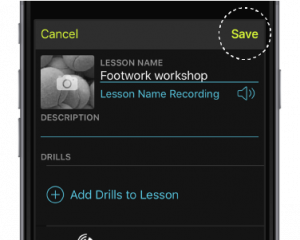
Step 3: Save the Lesson
- On the lesson screen, review the list of included drills. You can delete any drill by tapping on the red “-“ button.

- Tap on each drill’s duration to adjust it, if desired.
- Press and drag the handles on the right side to re-order the drills in any desired sequence.

- When you are satisfied with the lesson, tap “Save” in the upper right.
- Your lesson is now ready! The app shows you the total duration. To load the lesson on to your NT200, tap “Send to Device”.

Editing
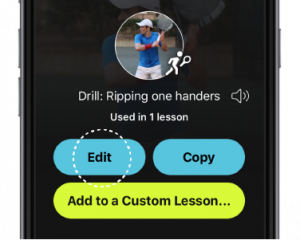
You can edit your custom coaching instructions, drills, and lessons to change any aspect you would like. Just go to the main screen for whatever you want to modify, and tap “Edit” (see picture).
NOTE: To delete a coaching instruction, drill, or lesson, go to its main screen and tap “Edit”. The “Edit” mode includes the ability to delete.
You cannot edit standard drills or lessons because these come from the NT library and only NT can update them to provide enhancements.
NOTE: You can edit a standard coaching instruction, but the only allowed change is to add new recordings, in case you would like to use a different voice.
Copying
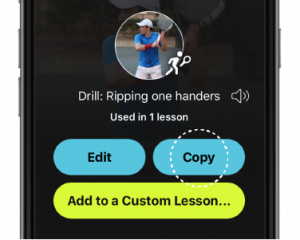
If you like a standard drill or lesson, but want to make some changes to it, you can copy it. The copy is your own custom version, and now, you can edit it.
For example, if you like a standard drill, but you want to add a few coaching instructions, go to the drill’s main screen and tap “Copy” (see picture). The same thing works for standard lessons.
You can also copy your custom lessons and drills to create variations.
Sharing with Other Players
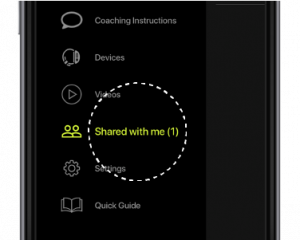
The NeuroTennis app lets you share content with other players. If you are a coach, this is a great way to send content to your students who have NeuroTennis.
Say you want to share a lesson with a friend. Open the lesson, and use the “…” menu. Select “Share”. Fill in the username of the person you want to share with. You may have to ask them for their username. A user can check their username in Settings->Profile.
When someone shares content with you, you will see the number next to “Shared with me” change in the main menu. If you have an Android phone, you will also see a notification (not available yet in the iPhone app). Tap on “Shared with me” to see your “inbox”. Tap on any shared content you want to accept. The content will be added to the appropriate section of your NT library.
Video Downloads
Not all courts have Wifi. That’s why the app offers most features and content even without an internet connection. You can still access all your lessons, drills, and coaching instruction. You can even create new content.
However, there is one type of content that the app does not keep on your phone by default: the videos for coaching instructions. The reason is that videos take more space than other types of information, and we don’t want to minimize the amount of storage we use on your phone. When you play a video, we download it to your phone.
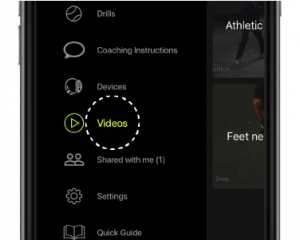
You may want to watch certain videos on the court, to remind yourself of key points before playing. To make this possible, the app allows you to select specific videos you want to download and store on your phone. Try it out: pick one of your favorite coaching instructions and open it in the app, If the instruction has a video, you will see a “cloud” icon with an arrow as shown below. While connected to the internet, tap on the button to download the video. Once the video is downloaded, the arrow changes to a check mark. Tap the “play” button to view it. You can also select the “Videos” option of the main menu to access all the videos you’ve stored on your phone (See above).
Settings
Using Settings
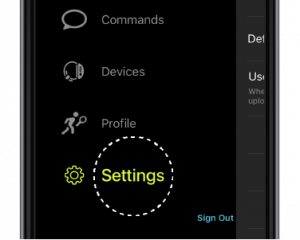
Access settings for the NT app from the main menu by tapping on “Settings” (see picture). This screen provides access to:
- About: Information about your NT app and its version.
- Configurations for various features of the NT app.
Most of these settings are self-explanatory and the NT app provides on-screen help.
Choose Default Voice
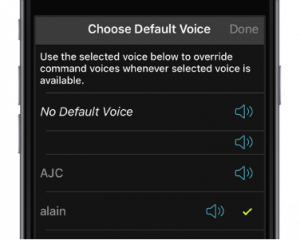
The Default Voice allows you to indicate a preferred voice for coaching instructions in your custom lessons.
Default Voice only matters when a lesson contains coaching instructions that have multiple voice recordings. NT needs to know which voice recording to use for each coaching instruction. The NT app uses this information when it sends the lesson (and all of its included coaching instructions and recordings) to the NT device.
When you choose a default voice, the NT app will use that voice for every coaching instruction that has the voice available. In the example above, NT will use the voice called “alain” whenever it is available.
How Default Voice Works
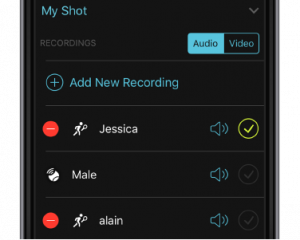
If a coaching instruction has the Default Voice available, NT will use that voice for the coaching instruction. In the example shown, the coaching instruction’s selected voice is “Jessica”. However, because the Default Voice in Settings is set to “alain”, and the coaching instruction also contains a recording with that voice, the recording labeled “alain” will override.
NOTE: When the setting for Default Voice is No Default Voice, NT will use the voice selected on each coaching instruction (the one with the check mark).


